aside utilizes divs and puts the note to the right margin.
If you want to master the literate coding, you should be patient in your progress. Try using Quarto everyday for your work. For the first couple of days, you may be slow, but it will become a second nature sooner or later.
2.7 Divs and Spans
You can add classes, attributes, and other identifiers to regions of content using Divs and Spans (you’ll see an example of this below in Section 2.8).
2.7.1 Divs
For example, here we add the “border” class to a region of content using a div (:::):
::: {.border}
This content can be styled with a border
:::
Once rendered to HTML, Quarto will translate the markdown into:
<div class="border">
  <p>This content can be styled with a border</p>
</div>
An example of two column layout with penguins data is provided in Section 2.13.
2.7.2 Spans
A bracketed sequence of inlines, as one would use to begin a link, will be treated as a Span with attributes if it is followed immediately by attributes:
[This is *some text*]{.class key="val"}
Once rendered to HTML, Quarto will translate the markdown into
<span class="class" data-key="val">
  This is <em>some text</em>
</span>
2.8 Callout Blocks
Note
Callouts are markdown divs that have special callout attributes.
Important
We can insert a callout using the Insert Anything tool.
Annotations for a code cell consist of two related elements:
Each annotated line should be terminated with a comment (using the code cell’s language comment character) followed by a space and then an annotation number enclosed in angle brackets (e.g. # <2>). You may repeat an annotation number if the annotation spans multiple lines.
An ordered list that appears immediately after the code cell which includes the contents of each annotation. Each numbered item in the ordered list will correspond to the line(s) of code with the same annotation number.
For example, If the annotations are made,
```rlibrary(tidyverse)library(palmerpenguins)penguins |># <1>mutate( # <2>bill_ratio = bill_depth_mm / bill_length_mm, # <2>bill_area = bill_depth_mm * bill_length_mm # <2> ) # <2>```1. Take `penguins`, and then,2. add new columns for the bill ratio and bill area.
we will have the following rendered in the document.
# A tibble: 344 × 10
   species island    bill_length_mm bill_depth_mm flipper_length_mm body_mass_g
   <fct>   <fct>              <dbl>         <dbl>             <int>       <int>
 1 Adelie  Torgersen           39.1          18.7               181        3750
 2 Adelie  Torgersen           39.5          17.4               186        3800
 3 Adelie  Torgersen           40.3          18                 195        3250
 4 Adelie  Torgersen           NA            NA                  NA          NA
 5 Adelie  Torgersen           36.7          19.3               193        3450
 6 Adelie  Torgersen           39.3          20.6               190        3650
 7 Adelie  Torgersen           38.9          17.8               181        3625
 8 Adelie  Torgersen           39.2          19.6               195        4675
 9 Adelie  Torgersen           34.1          18.1               193        3475
10 Adelie  Torgersen           42            20.2               190        4250
# ℹ 334 more rows
# ℹ 4 more variables: sex <fct>, year <int>, bill_ratio <dbl>, bill_area <dbl>
2.10.2 Annotation Style
below
By default (or if code-annotations: below is specified), code annotation text will appear below the code cell.
hover
Code annotation text will be displayed when the user hovers over the annotation marker for a line of code (if code-annotations: hover is specified)).
select
If code-annotations: select is specified, code annotation text will be displayed when the user clicks on an annotation marker (selecting it). The annotation text can be dismissed by clicking the annotation marker once again.
2.11 Article Layout
We can use the column: page-right cell option to indicate we would like our figure to occupy the full width of the screen, with some inset.
See the documentation on Article Layout for additional details.
Figure 1: Penguin Species Drawing by Allison Horst
Figure 2: Explaining Bill Dimensions
The average bill length is 43.99 mm and he average bill depth is 17.16 mm.
The data was collected between 2007 and 2009.
2.14 Figures
# A tibble: 234 × 11
   manufacturer model      displ  year   cyl trans drv     cty   hwy fl    class
   <chr>        <chr>      <dbl> <int> <int> <chr> <chr> <int> <int> <chr> <chr>
 1 audi         a4           1.8  1999     4 auto… f        18    29 p     comp…
 2 audi         a4           1.8  1999     4 manu… f        21    29 p     comp…
 3 audi         a4           2    2008     4 manu… f        20    31 p     comp…
 4 audi         a4           2    2008     4 auto… f        21    30 p     comp…
 5 audi         a4           2.8  1999     6 auto… f        16    26 p     comp…
 6 audi         a4           2.8  1999     6 manu… f        18    26 p     comp…
 7 audi         a4           3.1  2008     6 auto… f        18    27 p     comp…
 8 audi         a4 quattro   1.8  1999     4 manu… 4        18    26 p     comp…
 9 audi         a4 quattro   1.8  1999     4 auto… 4        16    25 p     comp…
10 audi         a4 quattro   2    2008     4 manu… 4        20    28 p     comp…
# ℹ 224 more rows
Show the code
```{r}#| label: fig-scatterplot#| fig-cap: "City and highway mileage for 38 popular models of cars."#| fig-alt: "Scatterplot of city vs. highway mileage for cars, where points are colored by the number of cylinders. The plot displays a positive, linear, and strong relationship between city and highway mileage, and mileage increases as the number of cylinders decreases."#| fig-width: 6#| fig-height: 3.5#| code-line-numbers: trueggplot(mpg, aes(x = hwy, y = cty, color = cyl)) +geom_point(alpha =0.5, size =2) +scale_color_viridis_c() +theme_minimal()```
Figure 3: City and highway mileage for 38 popular models of cars.
Update
Figure 3 shows a positive, strong, and linear relationship between the city and highway mileage.
2.15 Multiple Figures
The plots in Figure 4 show the relationship between city and highway mileage for 38 popular models of cars. In Figure 4 (a) the points are colored by the number of cylinders while in Figure 4 (b) the points are colored by engine displacement.
Show the code
```{r}#| label: fig-mpg#| fig-cap: "City and highway mileage for 38 popular models of cars."#| fig-subcap:#| - "Color by number of cylinders"#| - "Color by engine displacement, in liters"#| layout-ncol: 2#| column: page-rightggplot(mpg, aes(x = hwy, y = cty, color = cyl)) +geom_point(alpha =0.5, size =2) +scale_color_viridis_c() +theme_minimal()ggplot(mpg, aes(x = hwy, y = cty, color = displ)) +geom_point(alpha =0.5, size =2) +scale_color_viridis_c(option ="E") +theme_minimal()```
(a) Color by number of cylinders
(b) Color by engine displacement, in liters
Figure 4: City and highway mileage for 38 popular models of cars.
Tip
If you have 3, 4, or more figures in a panel there are many options available for customizing their layout. See the article Figure Layout for details.
---format:html:code-links:-text: Code Fileicon: file-codehref: M02-Literate_Coding-Advanced.qmdother-links:-text: Data Wrangling and Visualization Certificate Programicon: awardhref: https://www.cpp.edu/cba/customer-insights-lab/curriculum/certificate/dwv/index.shtml-text: Master of Science in Digital Marketingicon: bankhref: https://www.cpp.edu/cba/graduate-business-programs/programs/master-degree-in-digital-marketing-and-marketing-analytics.shtml---
You might alternatively want to create an entirely self-contained HTML document (with images, CSS style sheets, JavaScript, etc. embedded into the HTML file). You can do this by specifying the embed-resources option:
Sass theme files can define both variables that globally set things like colors and fonts, as well as rules that define more fine grained behavior. To customize an existing Bootstrap theme with your own set of variables and/or rules, just provide the base theme and then your custom theme file(s):
theme:- cosmo- custom.scss
The scss file consists of the follwoing two sections:
You can also use a completely customized theme of your own as in
theme: custom.scss
5.5 Dark Mode
You may also provide a light and dark theme.
Quarto will automatically create a toggle to allow your reader to select the desired dark or light appearance.
The toggle will automatically appear in the top right corner of your html output.
For example:
theme:light: faltlydark: darkly
5.5.1 Customizing Themes
You may provide a custom theme for dark and light mode, or a list of scss files to customize the light and dark appearance.
For example uses the following to use a light cosmo theme and then customizes the cosmo theme with additional Sass variables when in dark mode:
theme:light: cosmodark:[cosmo, theme-dark.scss]
5.6 Sass Variables
The Sass Variables can be specified within SCSS files (note that these variables should always be prefixed with a $ and are specified within theme files rather than within YAML options):
5.7 Sass Variables
The following Sass Variables can be specified within SCSS files (note that these variables should always be prefixed with a $ and are specified within theme files rather than within YAML options):
5.7.1 Colors
Variable
Notes
$body-bg
The page background color.
$body-color
The page text color.
$link-color
The link color.
$input-bg
The background color for HTML inputs.
$popover-bg
The background color for popovers (for example, when a citation preview is shown).
5.7.2 Fonts
Variable
Notes
$font-family-sans-serif
The sans-serif font family for the page.
$font-family-monospace
The monospace font family for the page.
$font-size-root
The base font size for the page.
$toc-font-size
The font size for the page TOC.
$h1-font-size
$h2-font-size
$h3-font-size
$h4-font-size
$h5-font-size
Font sizes for the specified headings.
5.7.3 Code Blocks
Variable
Notes
$code-block-border-left
By default, Quarto does not display a left border on code blocks. Set this variable to a truthy value or a CSS color to enable the left border.
$code-block-border-left-style
The style of the left border displayed on code blocks. Defaults to solid.
$code-block-border-left-size
The thickness of the left border displayed on code blocks. Defaults to 3px;
$code-block-padding-left
The amount of padding applied between the code and the border. Defaults to 0.6em.
$code-block-bg
By default, Quarto sets a background on code blocks by adding transparency to the theme’s progress-bg color. Set this variable to truthy value or a CSS color.
$code-block-bg-padding
The padding applied to the code block. Defaults to 0.4em.
$code-block-bg-alpha
The amount to alter the transparency fo the progress-bg color. This is not used if an explicit background color is set. Defaults to -0.35.
5.7.3.1 Code Annotation
You can customize the colors used to highlight lines when code annotation is used:
Variable
Notes
$code-annotation-higlight-color
The color used as a border on highlighted lines.
$code-annotation-higlight-bg
The color used for the background of highlighted lines.
5.7.3.2 Code Copy
You can also customize the colors of the button which appears for code-copy: true with the following variables:
Variable
Notes
$btn-code-copy-color
The color used for the copy button at the top right of code blocks.
$btn-code-copy-color-active
The hover color used for the copy button at the top right of code blocks.
5.7.4 Inline Code
Variable
Notes
$code-bg
The background color of inline code. Defaults to a mix between the body-bg and body-color.
$code-color
The text color of inline code. Defaults to a generated contrasting color against the code-bg.
5.7.5 Table of Contents
Variable
Notes
$toc-color
The color for table of contents text.
$toc-font-size
The font-size for table of contents text.
$toc-active-border
The left border color for the currently active table of contents item.
$toc-inactive-border
The left border colors for inactive table of contents items.
5.7.6 Layout
Variable
Notes
$content-padding-top
Padding that should appear before the main content area (including the sidebar, content, and TOC.
5.7.7 Navigation
Variable
Notes
$navbar-bg
The background color of the navbar. Defaults to the theme’s $primary color.
$navbar-fg
The color of foreground elements (text and navigation) on the navbar. If not specified, a contrasting color is automatically computed.
$navbar-hl
The highlight color for links in the navbar. If not specified, the $link-color is used or a contrasting color is automatically computed.
$sidebar-bg
The background color for a sidebar. Defaults to $light except when a navbar is present or when the style is floating. In that case it defaults to the $body-bg color.
$sidebar-fg
The color of foreground elements (text and navigation) on the sidebar. If not specified, a contrasting color is automatically computed.
$sidebar-hl
The highlight color for links in the sidebar. If not specified, the $link-color is used.
$footer-bg
The background color for the footer. Defaults to the $body-bg color.
$footer-fg
The color of foreground elements (text and navigation) on the footer. If not specified, a contrasting color is automatically computed.
5.7.8 Callouts
Variable
Notes
$callout-border-width
The left border width of callouts. Defaults to 5px.
$callout-border-scale
The border color of callouts computed by shifting the callout color by this amount. Defaults to 0%.
$callout-icon-scale
The color of the callout icon computed by shifting the callout color by this amount. Defaults to 10%.
$callout-margin-top
The amount of top margin on the callout. Defaults to 1.25rem.
$callout-margin-bottom
The amount of bottom margin on the callout. Defaults to 1.25rem.
$callout-color-<type>
The colors for the various types of callouts. Defaults:
Once your document is rendered to HTML, you can publish to RPubs (a free service from RStudio for sharing documents on the web) simply by clicking the Publish button on the editor toolbar or preview window. Alternatively, you can use the quarto::quarto_publish_doc() function.
```{r}quarto::quarto_publish_doc( "authoring.qmd", server ="rpubs.com" )```
You can optionally render Quarto documents into self contained HTML, whereby all of the content required to render the article (images generated by plots, required CSS and JavaScript, etc.) are bundled into a single HTML file. Use the embed-resources option to do this:
format:html:embed-resources:true
Then, you can share this HTML file using the same means you use to share other document types like spreadsheets, presentations, and PDFs (e.g by uploading it to Dropbox or any other file sharing service).
Note that when using embed-resources: true, math libraries like MathJax and KaTeX are not embedded by default because they are quite large and often time consuming to download. If you do want to embed math libraries, add the self-contained-math: true option:
This is a table caption added when a table was created in the visual mode.↩︎
Figures can be assigned to charts inside code chunks or the embedded graphics.↩︎
If the footnotes are not unique, readers will be confused.↩︎
Inline notes are easier to write, since you don’t have to pick an identifier and move down to type the note.↩︎
Source Code
---title: "Module 2 Advanced Literate Programming with Quarto"subtitle: "Advanced Codebook"author: "Jae Jung"date: '`r format(Sys.time())`'format: html: #theme: #light: cosmo #dark: darkly toc: true toc-depth: 3 toc-expand: 1 toc-location: right-body number-sections: true number-depth: 4 code-annotations: hover code-line-numbers: false code-fold: true code-summary: Show the code code-link: true code-overflow: scroll code-tools: true code-block-bg: true #code-block-border-left: "#31BAE9" highlight-style: arrow #embed-resources: true #self-contained-math: true anchor-sections: true smooth-scroll: true code-links: - text: Code File icon: file-code href: index.qmd other-links: - text: DWV 101 icon: award href: https://www.cpp.edu/cba/customer-insights-lab/curriculum/certificate/dwv/index.shtml - text: MS in Digital Marketing icon: bank href: https://www.cpp.edu/cba/graduate-business-programs/programs/master-degree-in-digital-marketing-and-marketing-analytics.shtml #link-external-icon: true link-external-newwindow: true fontsize: 1.1em linestretch: 1.7 #pdf: default #docx: defaulteditor: visualexecute: freeze: auto warning: false echo: fencedbibliography: references.biblink-citations: true---# Overview## Learning outcomes1. Describe the various authoring tools you can implement to make your Quarto document effective.2. Describe the various computational options you can implement on Quarto documents.## The [textbook](https://r4ds.hadley.nz/) chapters to cover:- Ch01: Introduction to R for Data Science- Ch28: Quarto- [Quarto Authoring](https://quarto.org/docs/authoring/markdown-basics.html)- [Quarto Computations](https://quarto.org/docs/computations/r.html)- [HTML](https://quarto.org/docs/output-formats/html-basics.html)```{r}#| echo: false#| include: false#install.packages('tidyverse')## One way to execute the command is to press "Crl" and "Enter" simultaneously line by line.library(tidyverse) # includes 8 packages, including ggplot2library(scales) # helps with scaleslibrary(GGally) # helps with correlations```# Quarto Authoring## Tables {#sec-tables}- Using source mode| Right | Left | Default | Center ||------:|:-----|---------|:------:|| 12 | 12 | 12 | 12 || 123 | 123 | 123 | 123 || 1 | 1 | 1 | 1 |<br>- Using visual mode|| Digital Marketing Strategy Emphasis | Marketing Analytics Emphasis ||--------------------|:--------------------------:|:----------------------:|| Major Required | 20 units | 20 units || Major Electives | 14 units | 14 units || Emphasis Recommended | 10 units | 10 units || Emphasis Other | 4 units | 4 units || ***Total Units*** | ***34 units*** | ***34 units*** |: MSDM Program Curriculum[^1][^1]: This is a table caption added when a table was created in the visual mode.## Citations {#sec-citations}- Easier in visual mode- doi: <https://doi.org/10.1093/comjnl/27.2.97>- Quarto is a literate programming[@knuth1984] tool. @knuth1984 is the one of first articles that advocate literate coding.## References- Automatically created at the end of the document.## Cross References {#sec-cross-references}- Provides numbered references and hyperlinks to *figures*, *tables*, *equations*, and *sections.*| Elements | ID | How to Cite ||-------------|:--------:|:-----------:|| Figures[^2]| #fig-xxx |`@fig-xxx`|| Tables | #tbl-xxx |`@tbl-xxx`|| Equations | #eq-xxx |`@eq-xxx`|| Sections | #sec-xxx |`@sec-xxx`|: Types of Referenceable Elements[^2]: Figures can be assigned to charts inside code chunks or the embedded graphics.- Cross-reference-able entities generally require a label (unique identifier) and a caption.Here is an example of cross-referencing to an equation: we can fit a simple linear regression model of the form shown in @eq-sales.## Footnote- An example of foot note is provided in @sec-cross-references.- Footnotes in a document should be unique[^3][^3]: If the footnotes are not unique, readers will be confused.### Inlines FootnoteHere is an inline note.^[Inline notes are easier to write, since you don't have to pick an identifier and move down to type the note.]## Aside`aside` utilizes divs and puts the note to the right margin.::: asideIf you want to master the literate coding, you should be patient in your progress. Try using Quarto everyday for your work. For the first couple of days, you may be slow, but it will become a second nature sooner or later.:::## Divs and SpansYou can add classes, attributes, and other identifiers to regions of content using Divs and Spans (you’ll see an example of this below in @sec-callout-blocks).### DivsFor example, here we add the “border” class to a region of content using a div (`:::`):``` ::: {.border} This content can be styled with a border :::```Once rendered to HTML, Quarto will translate the markdown into:``` <div class="border"> <p>This content can be styled with a border</p> </div>```An example of two column layout with `penguins` data is provided in @sec-columns.### SpansA bracketed sequence of inlines, as one would use to begin a link, will be treated as a Span with attributes if it is followed immediately by attributes:``` [This is *some text*]{.class key="val"}```Once rendered to HTML, Quarto will translate the markdown into``` <span class="class" data-key="val"> This is <em>some text</em></span>```## Callout Blocks {#sec-callout-blocks}::: callout-note- Callouts are markdown divs that have special callout attributes.:::::: callout-important- We can insert a callout using the Insert Anything tool.:::## Other Blocks- Refer to <https://quarto.org/docs/authoring/markdown-basics.html#other-blocks>## Code Annotation### Annotation SyntaxAnnotations for a code cell consist of two related elements:1. Each annotated line should be terminated with a comment (using the code cell's language comment character) followed by a space and then an annotation number enclosed in angle brackets (e.g. `# <2>`). You may repeat an annotation number if the annotation spans multiple lines.2. An ordered list that appears immediately after the code cell which includes the contents of each annotation. Each numbered item in the ordered list will correspond to the line(s) of code with the same annotation number.For example, If the annotations are made,```` markdown```rlibrary(tidyverse)library(palmerpenguins)penguins |># <1>mutate( # <2>bill_ratio = bill_depth_mm / bill_length_mm, # <2>bill_area = bill_depth_mm * bill_length_mm # <2> ) # <2>```1. Take `penguins`, and then,2. add new columns for the bill ratio and bill area.````we will have the following rendered in the document.```{r}#| code-fold: falselibrary(tidyverse)library(palmerpenguins)penguins |> # <1> mutate( # <2> bill_ratio = bill_depth_mm / bill_length_mm, # <2> bill_area = bill_depth_mm * bill_length_mm # <2> ) # <2>```1. Take `penguins` and then,2. add new columns for the bill ratio and bill area.### Annotation Style`below`: By default (or if `code-annotations: below` is specified), code annotation text will appear below the code cell.`hover`: Code annotation text will be displayed when the user hovers over the annotation marker for a line of code (if `code-annotations: hover` is specified)). `select`: If `code-annotations: select` is specified, code annotation text will be displayed when the user clicks on an annotation marker (selecting it). The annotation text can be dismissed by clicking the annotation marker once again.## Article Layout- We can use the `column: page-right` cell option to indicate we would like our figure to occupy the full width of the screen, with some inset.- See the documentation on [Article Layout](https://quarto.org/docs/authoring/article-layout.html) for additional details.- An illustration is given in @fig-mpg.## Videos{{< video https://www.youtube.com/embed/wo9vZccmqwc >}}## Columns {#sec-columns}```{r}#| echo: falselibrary(palmerpenguins)penguins <- penguins |> drop_na()```::: {layout-ncol="2"}{#fig-penguins}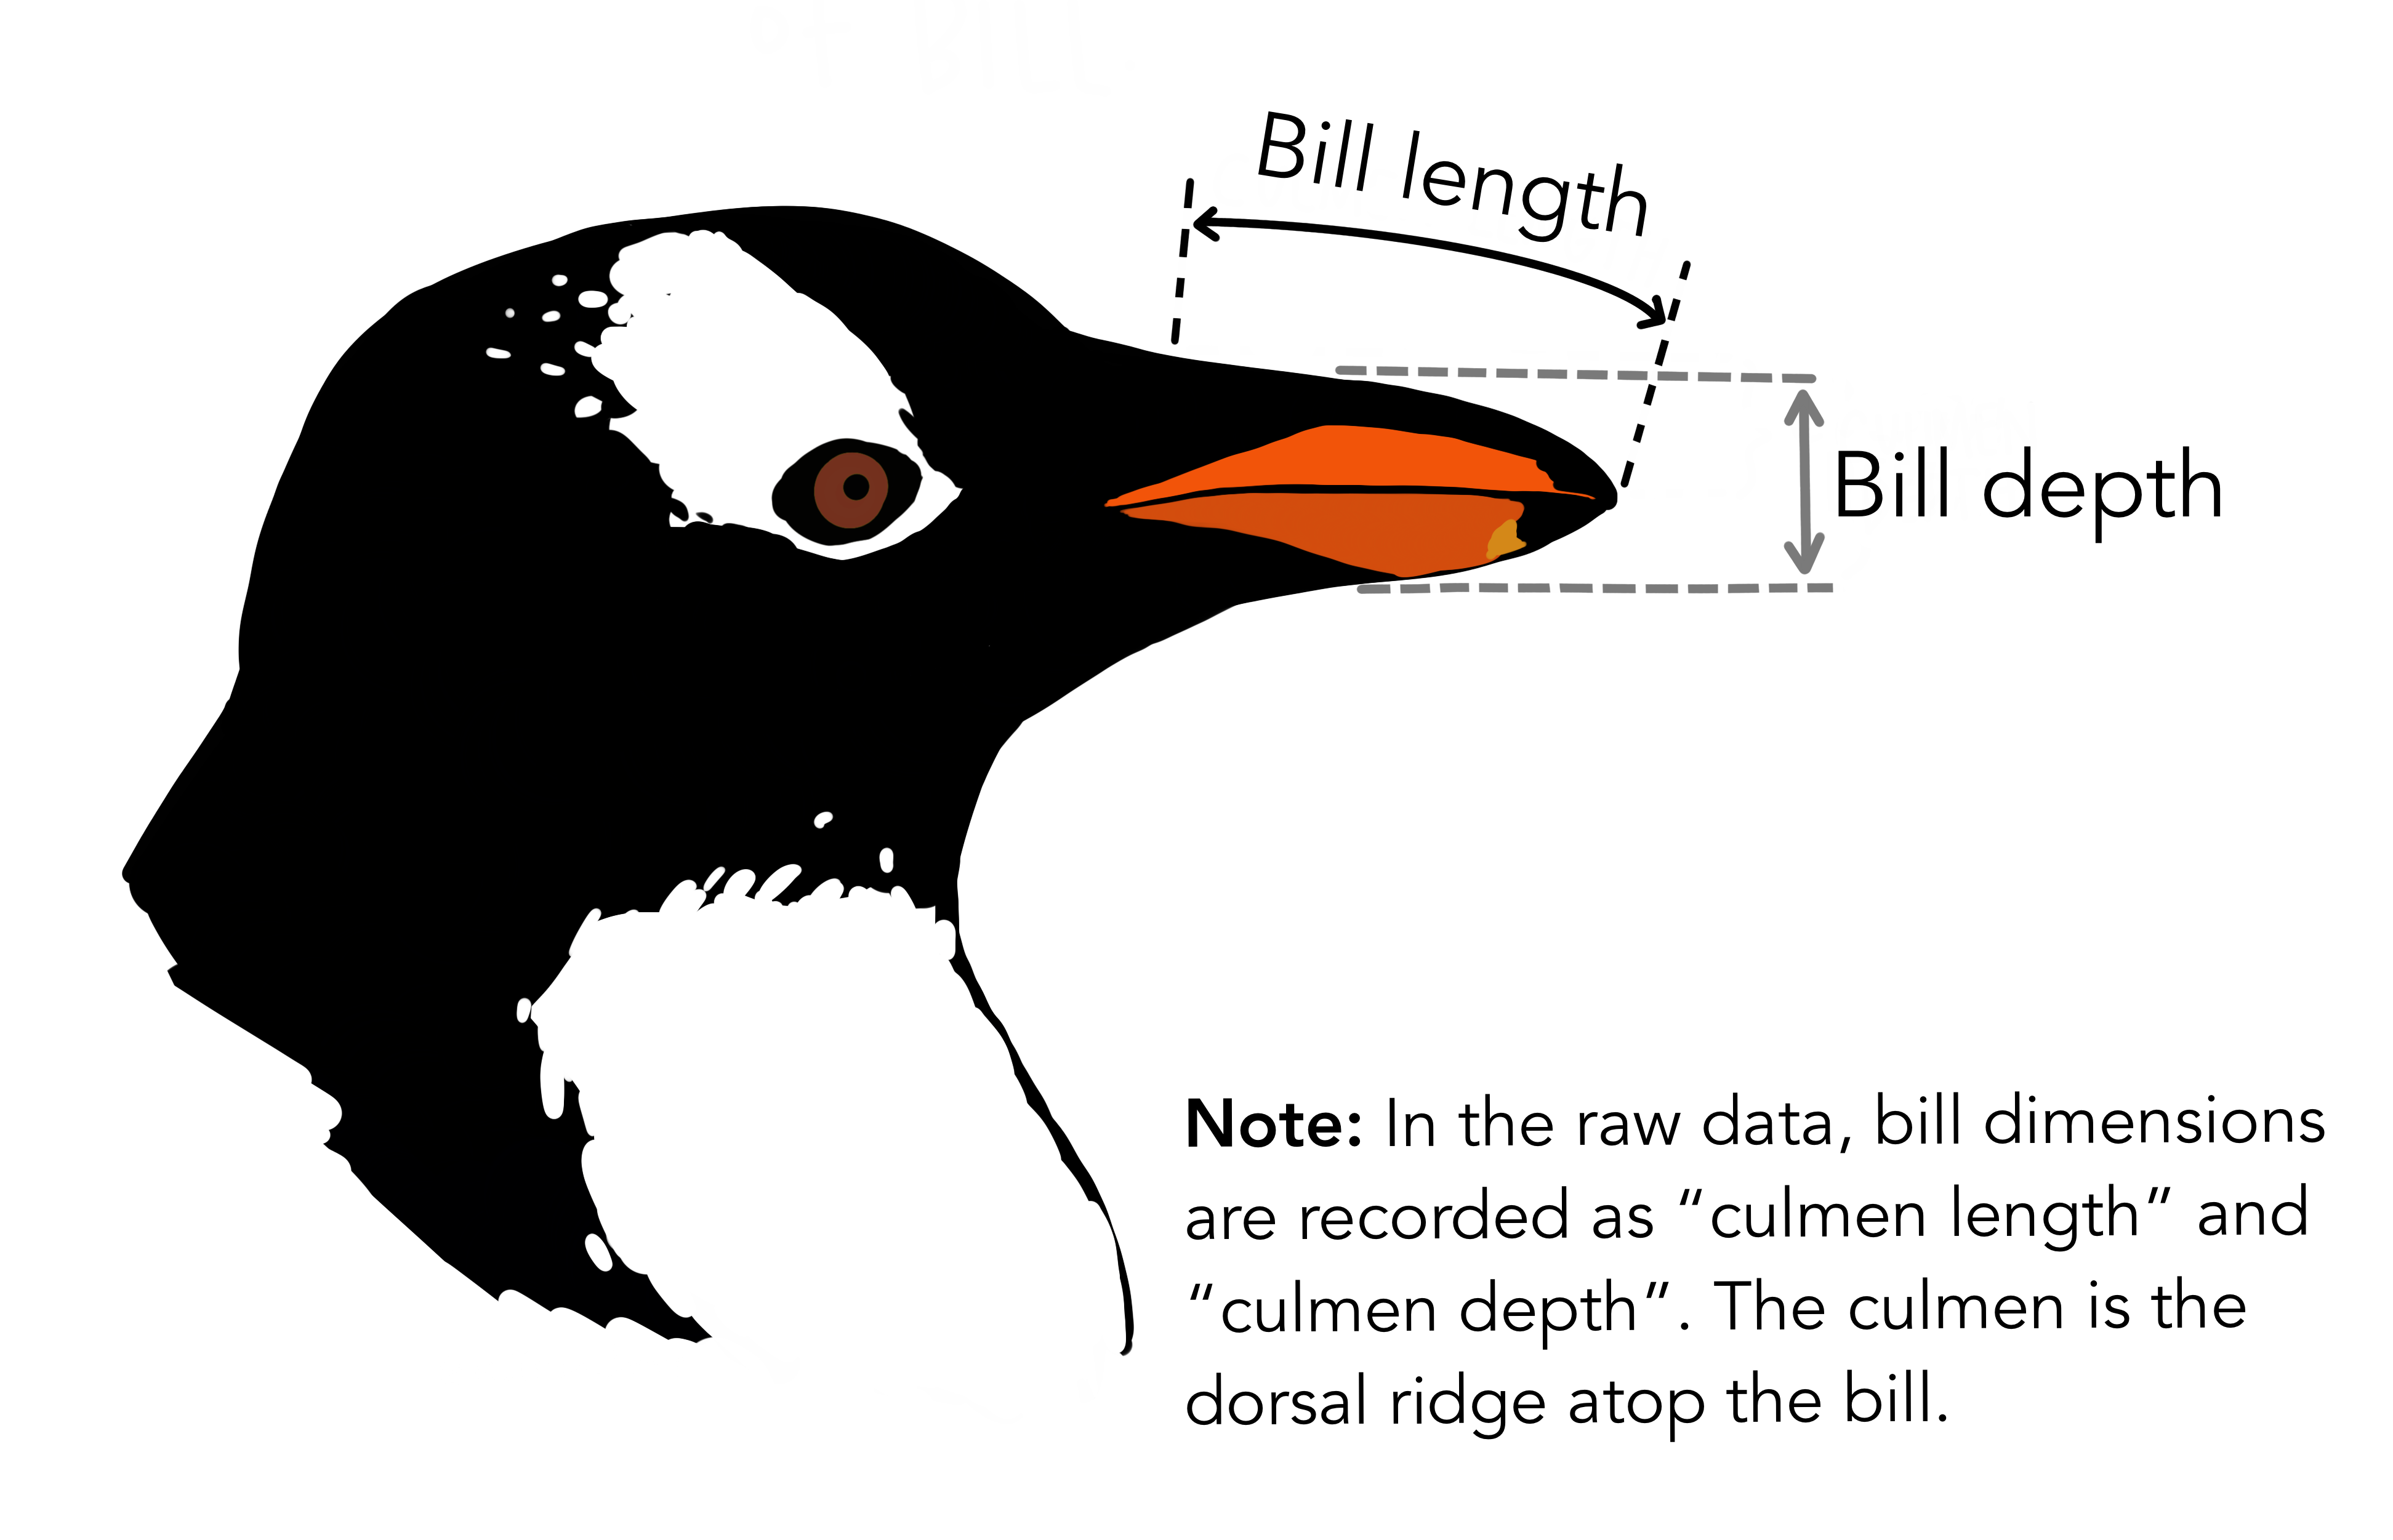{#fig-bill}:::::::: columns::: {.column width="50%"}The average bill length is `{r} round(mean(penguins$bill_length_mm), 2)` mm and he average bill depth is `r round(mean(penguins$bill_depth_mm) ,2)` mm.:::::: {.column width="50%"}The data was collected between `r min(penguins$year)` and `r max(penguins$year)`.::::::::## Figures```{r}#| echo: falsempg``````{r}#| label: fig-scatterplot#| fig-cap: "City and highway mileage for 38 popular models of cars."#| fig-alt: "Scatterplot of city vs. highway mileage for cars, where points are colored by the number of cylinders. The plot displays a positive, linear, and strong relationship between city and highway mileage, and mileage increases as the number of cylinders decreases."#| fig-width: 6#| fig-height: 3.5#| code-line-numbers: trueggplot(mpg, aes(x = hwy, y = cty, color = cyl)) + geom_point(alpha = 0.5, size = 2) + scale_color_viridis_c() + theme_minimal()```::: {.callout-note title="Update"}@fig-scatterplot shows a positive, strong, and linear relationship between the city and highway mileage.:::## Multiple FiguresThe plots in @fig-mpg show the relationship between city and highway mileage for 38 popular models of cars. In @fig-mpg-1 the points are colored by the number of cylinders while in @fig-mpg-2 the points are colored by engine displacement.```{r}#| label: fig-mpg#| fig-cap: "City and highway mileage for 38 popular models of cars."#| fig-subcap:#| - "Color by number of cylinders"#| - "Color by engine displacement, in liters"#| layout-ncol: 2#| column: page-rightggplot(mpg, aes(x = hwy, y = cty, color = cyl)) + geom_point(alpha = 0.5, size = 2) + scale_color_viridis_c() + theme_minimal()ggplot(mpg, aes(x = hwy, y = cty, color = displ)) + geom_point(alpha = 0.5, size = 2) + scale_color_viridis_c(option = "E") + theme_minimal()```::: callout-tipIf you have 3, 4, or more figures in a panel there are many options available for customizing their layout. See the article [Figure Layout](https://quarto.org/docs/authoring/figures.html#figure-panels) for details.:::## Data Frames``` ---title: "Document"format: html: df-print: paged---```# HTML Basics## Table of Contents### test section {.unnumbered .unlisted}### toc-depth {#sec-tocdepth}#### Default{.unnumbered} Default is 3```---toc: truetoc-depth: 3---```## toc-expand- Options + true + false + number (e.g., 2)```---toc: truetoc-expand: 2---```## toc-location- Options + right (default) + left + body + right-body + left-body```yamlformat: html: toc: true toc-location: right-body```## Section Numbering- Default is all levels- To exclude an individual heading from numbering add `.unnumbered` class to it as in @sec-tocdepth ```---number-sections: truenumber-depth: 3---```## Code links and Other links{#sec-codelinks}They appear in the page navigation under the headings “Code Links” and “Other Links” respectively.You can provide the following options for items in `code-links` and `other-links`:| Option | Description ||--------------------|---------------------------------------------------------|| `text` | The text to be displayed for the link. || `href` | The URL for the link. || `icon` | The [bootstrap icon](https://icons.getbootstrap.com/) for the link. || `rel` | The rel used in the `a` tag for this link. || `target` | The target used in the `a` tag for this link. |```yaml---format: html: code-links: - text: Code File icon: file-code href: M02-Literate_Coding-Advanced.qmd other-links: - text: Data Wrangling and Visualization Certificate Program icon: award href: https://www.cpp.edu/cba/customer-insights-lab/curriculum/certificate/dwv/index.shtml - text: Master of Science in Digital Marketing icon: bank href: https://www.cpp.edu/cba/graduate-business-programs/programs/master-degree-in-digital-marketing-and-marketing-analytics.shtml---```## LaTex Equations {#sec-equations}### Display equations$$Sales = \hat{\beta}_0 + \hat{\beta}_1 \times Ads + \epsilon$$ {#eq-sales}### inline equations- The relationship between ads spending and sales may be captured in this regression: $Sales = \hat{\beta}_0 + \hat{\beta}_1 \times Ads + \epsilon$## Tabset and Tabset Groups::: {.panel-tabset .border group="language"}### R``` {.r}fizz_buzz <- function(fbnums = 1:50) { output <- dplyr::case_when( fbnums %% 15 == 0 ~ "FizzBuzz", fbnums %% 3 == 0 ~ "Fizz", fbnums %% 5 == 0 ~ "Buzz", TRUE ~ as.character(fbnums) ) print(output)}```### Python``` {.python}def fizz_buzz(num): if num % 15 == 0: print("FizzBuzz") elif num % 5 == 0: print("Buzz") elif num % 3 == 0: print("Fizz") else: print(num)```:::- Tabs within a group are all switched together.::: {.panel-tabset group="language"}#### RTab content for R will be here.#### PythonTab content for Python will be here.:::## Self ContainedYou might alternatively want to create an entirely self-contained HTML document (with images, CSS style sheets, JavaScript, etc. embedded into the HTML file). You can do this by specifying the `embed-resources` option:``` yamlformat: html: embed-resources: true```## Anchor SectionsHover over a section title to see an anchor link. ```yamlformat: html: anchor-sections: true```## Smooth-scrollingEnable smooth scrolling within the page```yamlformat: html: smooth-scroll: true```## External Links### global control```yamlformat: html: link-external-icon: true link-external-newwindow: true link-external-filter: '^(?:http:|https:)\/\/www\.quarto\.org\/custom'```This document has a global control and its effect can be seen in @sec-codelinks.### local controlYou can also specify one or both of these behaviors for an individual link using the `.external` class and `target` attribute. For example, we can code like this:```r[DWV 101](https://www.cpp.edu/cba/customer-insights-lab/curriculum/certificate/dwv/index.shtml){.external target="_blank"}```The code will result in a hyperlink like this: [DWV 101](https://www.cpp.edu/cba/customer-insights-lab/curriculum/certificate/dwv/index.shtml){.external target="_blank"}## Lists# HTML Code Blocks## Hiding Code### Unexcuted Blocks- Double curly brackets.- printed as only one curly bracket```{python}1 + 1```- Use of four back ticks````---title: "My document"---Some markdown content.```{python}1+1```Some additional markdown content.````## Foding Code### Options| Value | Behavior ||---------|:----------------------||`false`| No folding (default) ||`true`| Fold code ||`show`| Fold code (initially shown) |### Type of ImplementationIt can be implemented globally and locally(@) Globally at the Yaml header ``` --- title: "Quarto Computations" format: html: code-fold: true code-summary: "Show the code" --- ```(@) Locally at the code chunk```{r}#| code-fold: true#| code-summary: "Show the code"```## Code OverflowThe default is `scroll`### global setting``` yamlformat:html:code-overflow: wrap```### code block setting```{python}#| code-overflow: wrap# very long line of code....```### Static code block settingFor a static code block, add the `.code-overflow-wrap` CSS class:```` python```{.python .code-overflow-wrap}# very long line of code....```````## Code ToolsControl it at the yaml only.### Default setting``` yamlformat:html:code-fold:truecode-tools:true```The above setting will results in the code tool icon appearing, right to the main header of the rendered HTML file: {.border fig-alt="A screen shot of the header of a rendered Quarto document showing the result of setting both the code-fold and code-tools option to true. There is a drop-down menu labeled 'Code' to the right of the page title with a triangle pointing down. The menu is open and there are three options listed vertically beneath it: 'Hide All Code,' 'Show All Code,' and 'View Source.'"}### Sub-options of `code-tools```` yaml format:html:code-tools:source:truetoggle:falsecaption: none```## AppearanceBy default code blocks are rendered with a left border whose color is derived from the current theme.See the `yaml` area for the current setting.## Highlighting- ExampleThe `highlight-style` option determines which theme is used. For example:``` yamlhighlight-style: github```These themes are "adaptive." These are designed to work well with sites that include a dark and light mode.- a11y- arrow- atom-one- ayu- breeze- github- gruvboxAll of the standard Pandoc themes are also available:- pygments- tango- espresso- zenburn- kate- monochrome- breezedark- haddockAs well as an additional set of extended themes, including:- dracula- monokai- nord- oblivion- printing- radical- solarized- vim-dark## Line NumbersIn this document, code line numbers can be seen @fig-scatterplot.## Code Linking- enables hyper-linking of functions within code blocks to their online documentation.``` yaml ---title:"Quarto Computations"format:html:code-link:true---```## Inline CodeThere are `{r} nrow(mpg)` observations in our data.```{r}#| echo: falsemean_cty <-round(mean(mpg$cty), 2)mean_hwy <-round(mean(mpg$hwy), 2)```The average city mileage of the cars in our data is `r mean_cty` and the average highway mileage is `r mean_hwy`.## Caching# HTML Theming## OverviewQuarto uses Bootstrap 5 by default for HTML, but there are other themes possible.``` yamltheme: default # bootstrap 5 defaulttheme: cosmo # cosmo bootswatch themetheme: pandoc # pandoc default html treatmenttheme: none # no theme css added to document```{{< include _theme-list.md >}}To change the theme, modify `yaml` header.``` yamlformat:html:theme: united```## Basic Options- Bootstrap or the Pandoc theme+--------------------------------------------------------------+----------------------------------------------------------------------------------------------------------------------------------------------------------------+| Option | Description |+==============================================================+================================================================================================================================================================+|`max-width`| The maximum width occupied by page content. Defaults to 1400px for bootstrap themes and 36em for the pandoc theme. |+--------------------------------------------------------------+----------------------------------------------------------------------------------------------------------------------------------------------------------------+|`mainfont`| Sets the [`font-family`](https://developer.mozilla.org/en-US/docs/Web/CSS/font-family) property for the document. |+--------------------------------------------------------------+----------------------------------------------------------------------------------------------------------------------------------------------------------------+|`fontsize`| Sets the base CSS [`font-size`](https://developer.mozilla.org/en-US/docs/Web/CSS/font-size) for the document. |+--------------------------------------------------------------+----------------------------------------------------------------------------------------------------------------------------------------------------------------+|`fontcolor`| Sets the default text [`color`](https://developer.mozilla.org/en-US/docs/Web/CSS/color) for the document. |+--------------------------------------------------------------+----------------------------------------------------------------------------------------------------------------------------------------------------------------+|`linkcolor`| Sets the default text [`color`](https://developer.mozilla.org/en-US/docs/Web/CSS/color) for hyperlinks. |+--------------------------------------------------------------+----------------------------------------------------------------------------------------------------------------------------------------------------------------+|`monofont`| Sets the [`font-family`](https://developer.mozilla.org/en-US/docs/Web/CSS/font-family) property for `<code>` elements. |+--------------------------------------------------------------+----------------------------------------------------------------------------------------------------------------------------------------------------------------+|`monobackgroundcolor`| Sets the [`background-color`](https://developer.mozilla.org/en-US/docs/Web/CSS/background-color) property for `<code>` elements. |+--------------------------------------------------------------+----------------------------------------------------------------------------------------------------------------------------------------------------------------+|`linestretch`| Sets the CSS [`line-height`](https://developer.mozilla.org/en-US/docs/Web/CSS/line-height) property (affects distance between lines of text, defaults to 1.5). |+--------------------------------------------------------------+----------------------------------------------------------------------------------------------------------------------------------------------------------------+|`backgroundcolor`| Sets the [`background-color`](https://developer.mozilla.org/en-US/docs/Web/CSS/background-color) for the document. |+--------------------------------------------------------------+----------------------------------------------------------------------------------------------------------------------------------------------------------------+|`margin-left`, `margin-right`, `margin-top`, `margin-bottom`| Sets the CSS [`margin`](https://developer.mozilla.org/en-US/docs/Web/CSS/margin) properties for the document body. |+--------------------------------------------------------------+----------------------------------------------------------------------------------------------------------------------------------------------------------------+- Yaml setting + The default line height is 1.5 + If we want to set the font-size a bit larger and specify that we want a bit more space between lines of text:``` yamltitle:"My Document"format:html:theme: cosmofontsize: 1.1emlinestretch:1.7```## Theme OptionsSass theme files can define both variables that globally set things like colors and fonts, as well as rules that define more fine grained behavior. To customize an existing Bootstrap theme with your own set of variables and/or rules, just provide the base theme and then your custom theme file(s):``` yamltheme:-cosmo-custom.scss```The `scss` file consists of the follwoing two sections:- Variable section + `/*-- scss:defaults --*/`- Rules section + `/*-- scss:rules --*/`Here is an example of `custom.scss` file``` scss/*-- scss:defaults --*/$h2-font-size: 1.6rem !default;$headings-font-weight: 500 !default;/*-- scss:rules --*/h1, h2, h3, h4, h5, h6 { text-shadow: -1px -1px 0 rgba(0, 0, 0, .3);}```## Custom ThemesYou can also use a completely customized theme of your own as in``` yamltheme: custom.scss```## Dark Mode- You may also provide a light and dark theme.- Quarto will automatically create a toggle to allow your reader to select the desired dark or light appearance. - The toggle will automatically appear in the top right corner of your html output. For example:``` yamltheme:light: faltlydark: darkly```### Customizing Themes- You may provide a custom theme for dark and light mode, or a list of scss files to customize the light and dark appearance. - For example uses the following to use a light cosmo theme and then customizes the cosmo theme with additional Sass variables when in dark mode:``` yamltheme:light: cosmodark:[cosmo, theme-dark.scss]```## Sass VariablesThe Sass Variables can be specified within SCSS files (note that these variables should always be prefixed with a $ and are specified within theme files rather than within YAML options):{{< include _theme-variables.md >}}# Publishing- Once your document is rendered to HTML, you can publish to [RPubs](https://rpubs.com/) (a free service from RStudio for sharing documents on the web) simply by clicking the  Publish button on the editor toolbar or preview window. Alternatively, you can use the `quarto::quarto_publish_doc()` function.```{r} quarto::quarto_publish_doc( "authoring.qmd", server ="rpubs.com" )```## Publish CommandThe `quarto publish` command provides a straightforward way to publish documents to the following:- [Quarto Pub](https://quarto.org/docs/publishing/quarto-pub.html)- [GitHub Pages](https://quarto.org/docs/publishing/github-pages.html),- [Netlify](https://quarto.org/docs/publishing/netlify.html), and - [Posit Connect](https://quarto.org/docs/publishing/rstudio-connect.html).For example, here are the commands to publish `document.qmd` to each of these services:```{.bash filename="Terminal"}quarto publish quarto-pub document.qmdquarto publish gh-pages document.qmdquarto publish netlify document.qmdquarto publish connect document.qmd```## Standalone HTMLYou can optionally render Quarto documents into self contained HTML, whereby all of the content required to render the article (images generated by plots, required CSS and JavaScript, etc.) are bundled into a single HTML file. Use the `embed-resources` option to do this:``` yamlformat:html:embed-resources:true```Then, you can share this HTML file using the same means you use to share other document types like spreadsheets, presentations, and PDFs (e.g by uploading it to Dropbox or any other file sharing service).Note that when using `embed-resources: true`, math libraries like [MathJax](https://www.mathjax.org/) and [KaTeX](https://katex.org/) are not embedded by default because they are quite large and often time consuming to download. If you do want to embed math libraries, add the `self-contained-math: true` option:``` yamlformat:html:embed-resources:trueself-contained-math:true```# Resources - Quarto Guide: <https://quarto.org/docs/guide/>## References {.unnumbered}


 Publish button on the editor toolbar or preview window. Alternatively, you can use the